EPAS Integration
Refer to the document labeled EPAS Operations for basic EPAS installation and configuration. Once EPAS is configured within an environment, in order to enable CyberArk integration, the following steps should be performed:
- Configuring EPAS for standalone Credential Provider integration
- Configuring EPAS for Central Credential Provider integration
- Defining EPAS target systems with CyberArk integration
Configuring EPAS for standalone Credential Provider integration
-
Configure the CyberArk credential provider connection and provisioning details.
- Logged in as an EPAS Administrator, navigate to the System → Integration page.
- Click on the CyberArk Credential Providers tab.
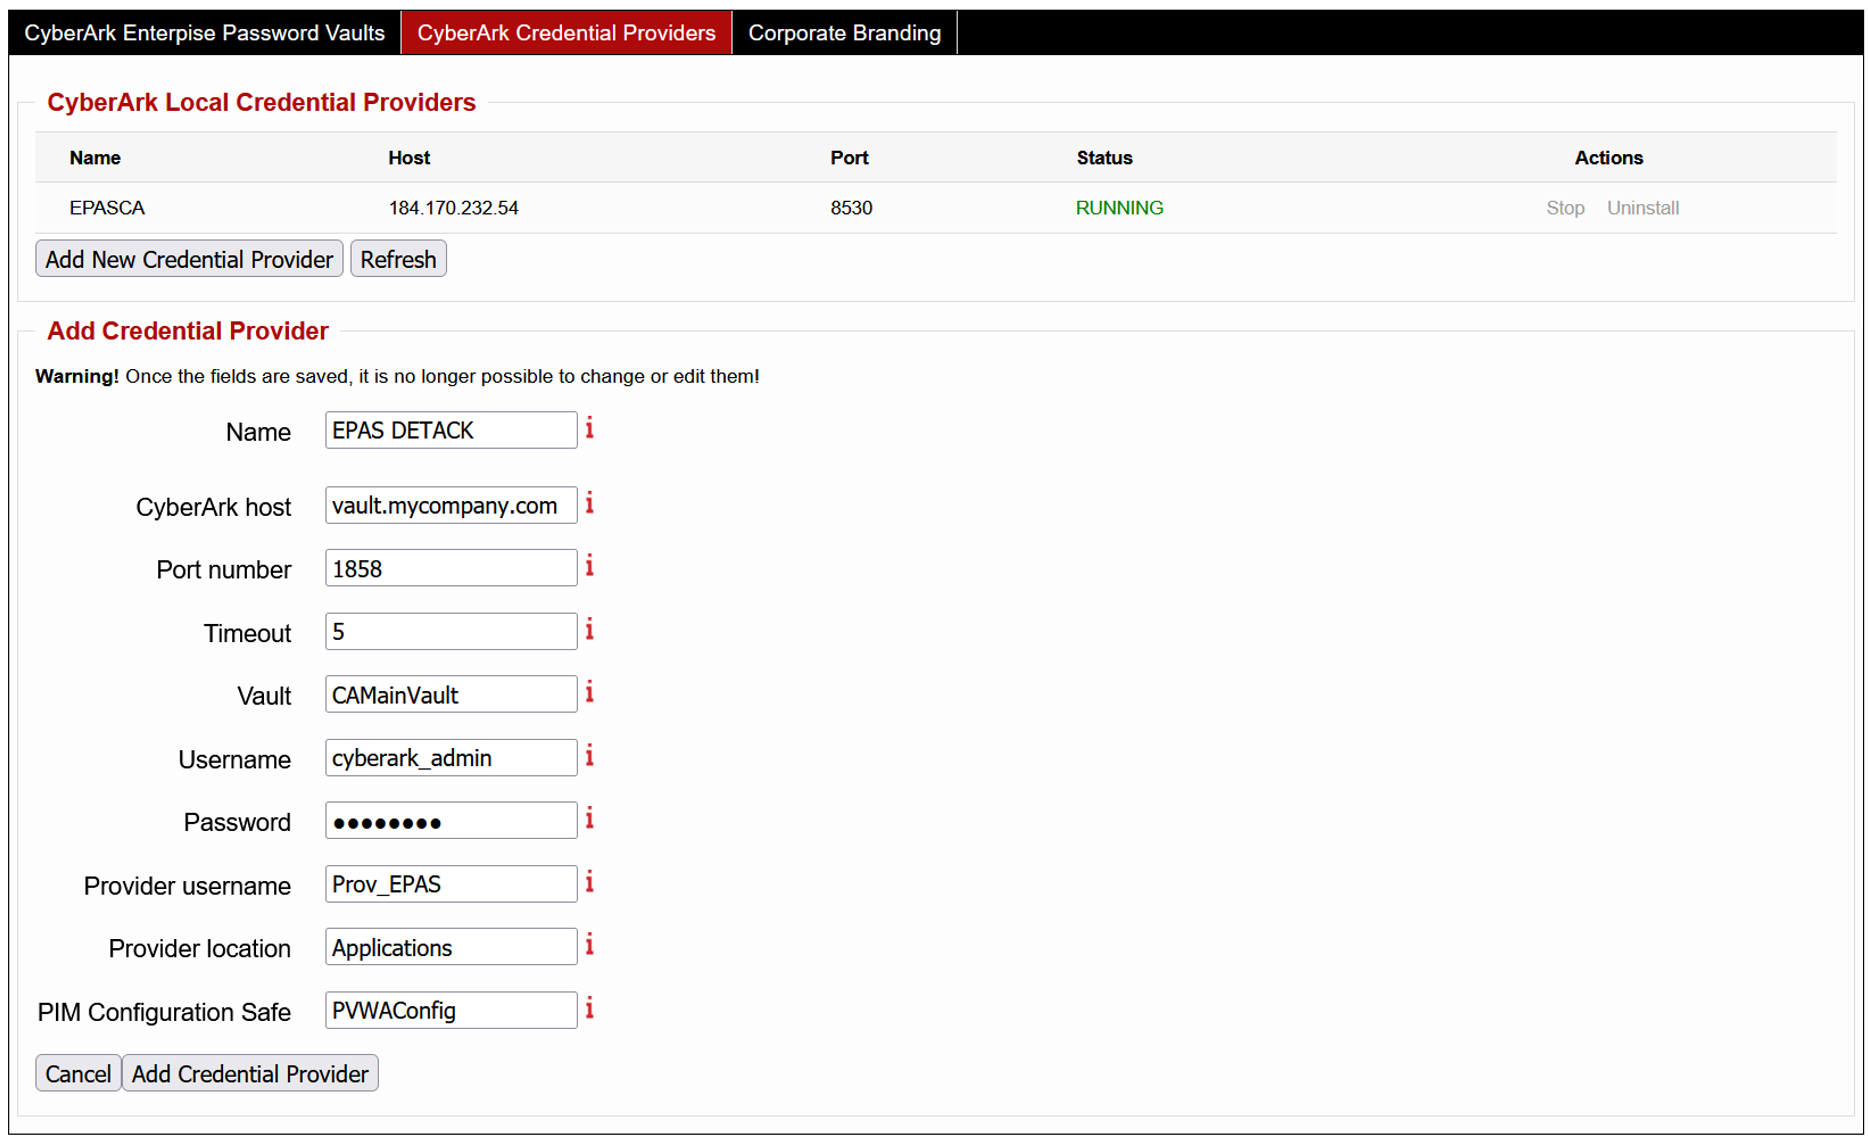
- Click the Add New Credential Provider action.
- Enter a name for the defined credential provider.
- Enter the hostname assigned to the CyberArk AAM Vault.
- Enter the port number associated with the Vault.
- Enter the credentials associated with the Vault access, which are allowed to provision new providers (administrative).
- Change (if applicable) any of the default options for the created provider: username, location and configuration safe.
- Save the changes. The provisioning of the credential provider will start, creating the aforementioned provider user and starting the (EPAS local) credential provider service.
-
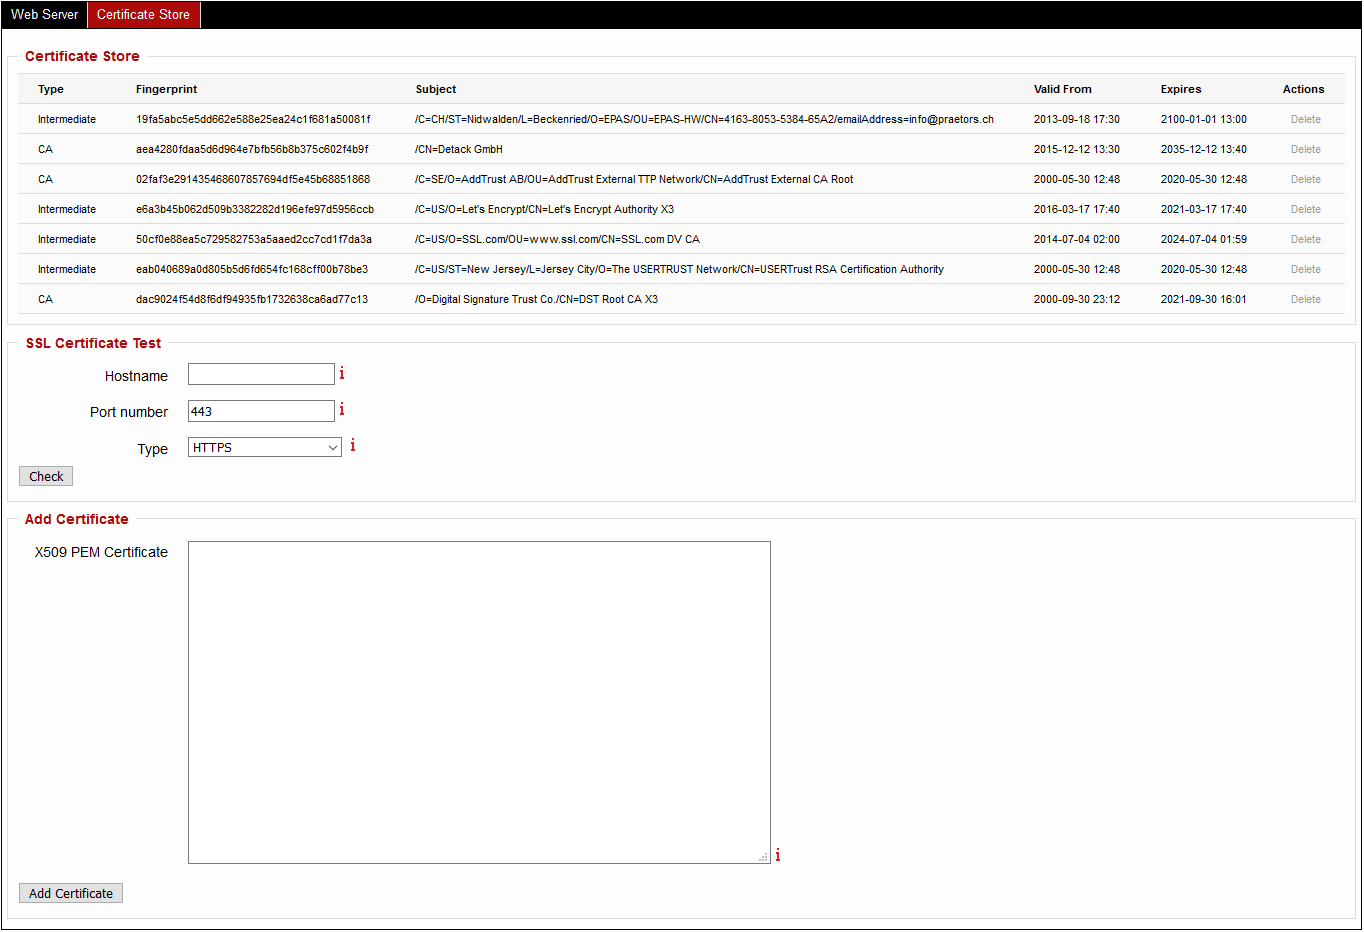
Updating the internal Certificate Authority store to include the certificate chain used by the HTTPS-enabled Central Credential Provider endpoint.
- Logged in as an EPAS Administrator, navigate to the System → SSL Settings page.
- Click on the Certificate Store tab.
- Enter in the X509 PEM Certificate an X509 PEM encoded trusted certificate (either CA or Intermediate).
- Repeat step c) for all certificates in the chain, up to (not including) the Central Credential Provider server certificate.
Note
Before continuing to Step 2, it is recommended to confirm that the CyberArk Central Credential Provider endpoint is set-up using secure (TLS) channel encryption; EPAS will not accept any endpoint configured to use plain-text.
-
Configure the CyberArk credential provider location, port number, virtual host and application ID (see section Defining the application id (Appid) and authentication details).
- Logged in as an EPAS Administrator, navigate to the System → Integration page.
- Click on the CyberArk Enterprise Password Vaults tab.
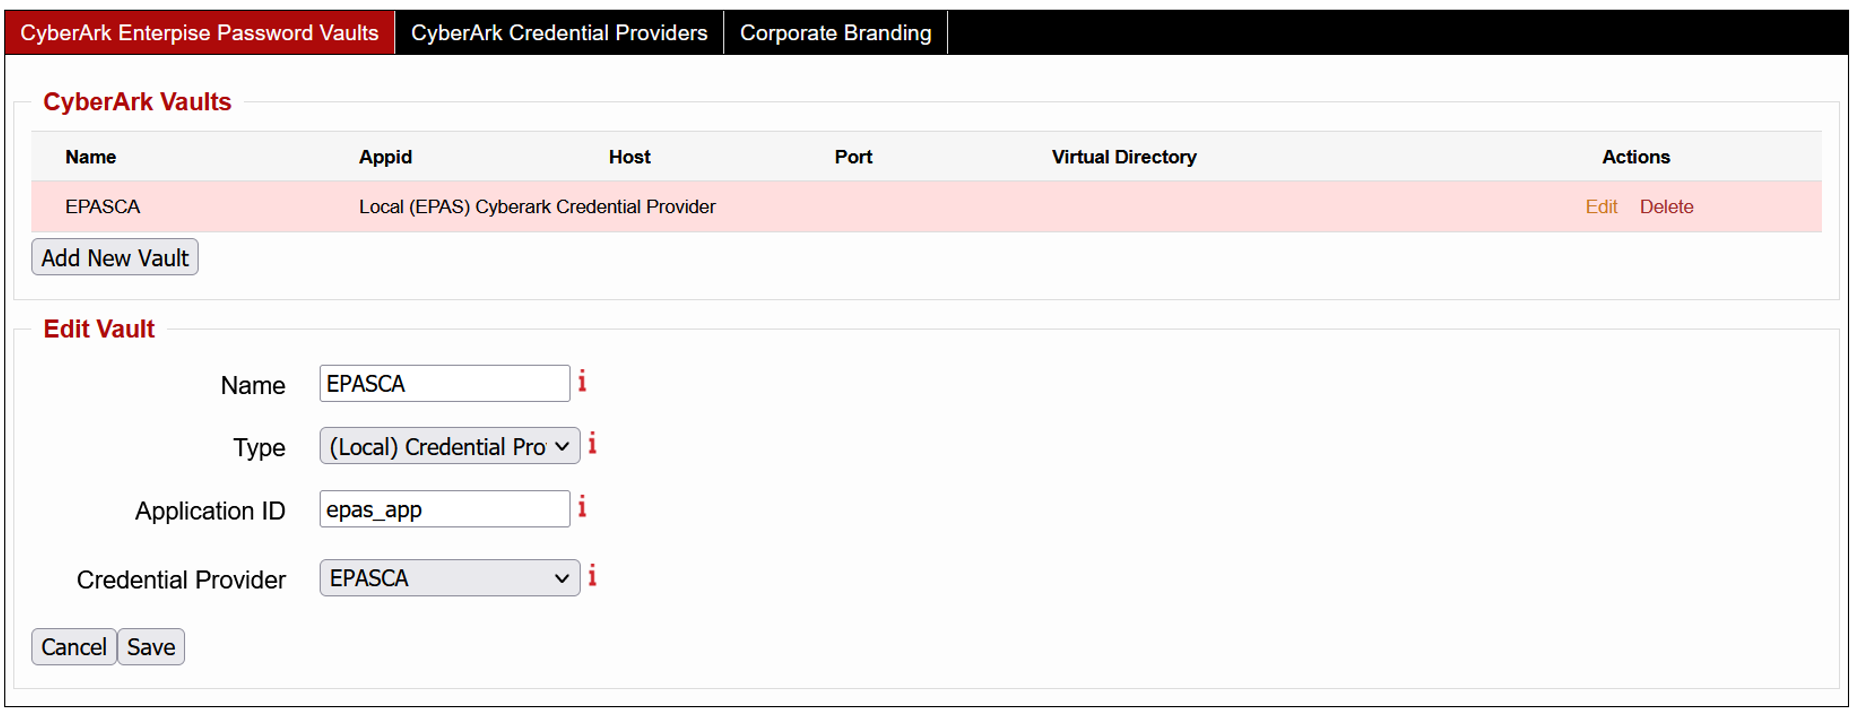
- Click the Add New Vault action.
- Enter a name for the defined vault.
- Select the (Local) Credential Provider type.
- Enter the application ID assigned to the EPAS MASTER.
- Select the credential provider defined in Step 1.
- Save the changes.
It is now possible to define EPAS target systems which leverage the CyberArk Vault in order to retrieve credentials.
Configuring EPAS for Central Credential Provider integration
-
Updating the internal Certificate Authority store to include the certificate chain used by the HTTPS-enabled Central Credential Provider endpoint.
- Logged in as an EPAS Administrator, navigate to the System → SSL Settings page.
- Click on the Certificate Store tab.
- Enter in the X509 PEM Certificate an X509 PEM encoded trusted certificate (either CA or Intermediate).
- Repeat step c) for all certificates in the chain, up to (not including) the Central Credential Provider server certificate.
Note
Before continuing to Step 2, it is recommended to confirm that the CyberArk Central Credential Provider endpoint is set-up using secure (TLS) channel encryption; EPAS will not accept any endpoint configured to use plain-text.
-
Configure the CyberArk credential provider location, port number, virtual host and application ID (see section Defining the application id (Appid) and authentication details).
- Logged in as an EPAS Administrator, navigate to the System → Integration page.
- Click on the CyberArk Enterprise Password Vaults tab.
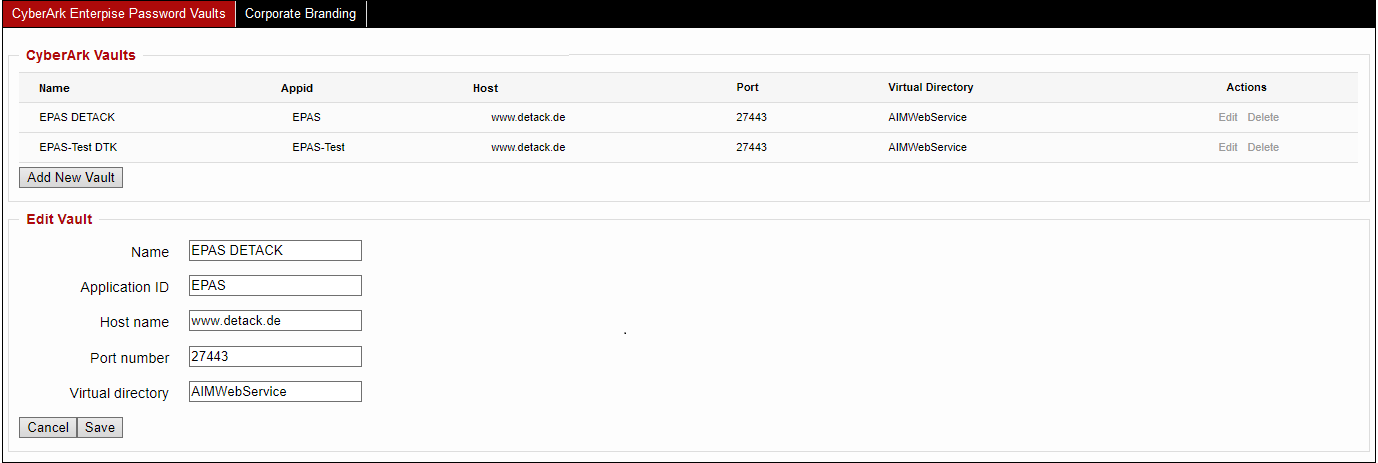
- Click the Add New Vault action.
- Enter a name for the defined vault.
- Enter the application ID assigned to the EPAS MASTER.
- Enter the port number associated with the Central Credential Provider.
- Enter the virtual directory associated with the Central Credential Provider (the default value is AIMWebService).
- Save the changes.
It is now possible to define EPAS target systems which leverage the CyberArk Vault in order to retrieve credentials.
Defining EPAS target systems with CyberArk integration
To use credentials provided by the CyberArk in EPAS single target retrievals:
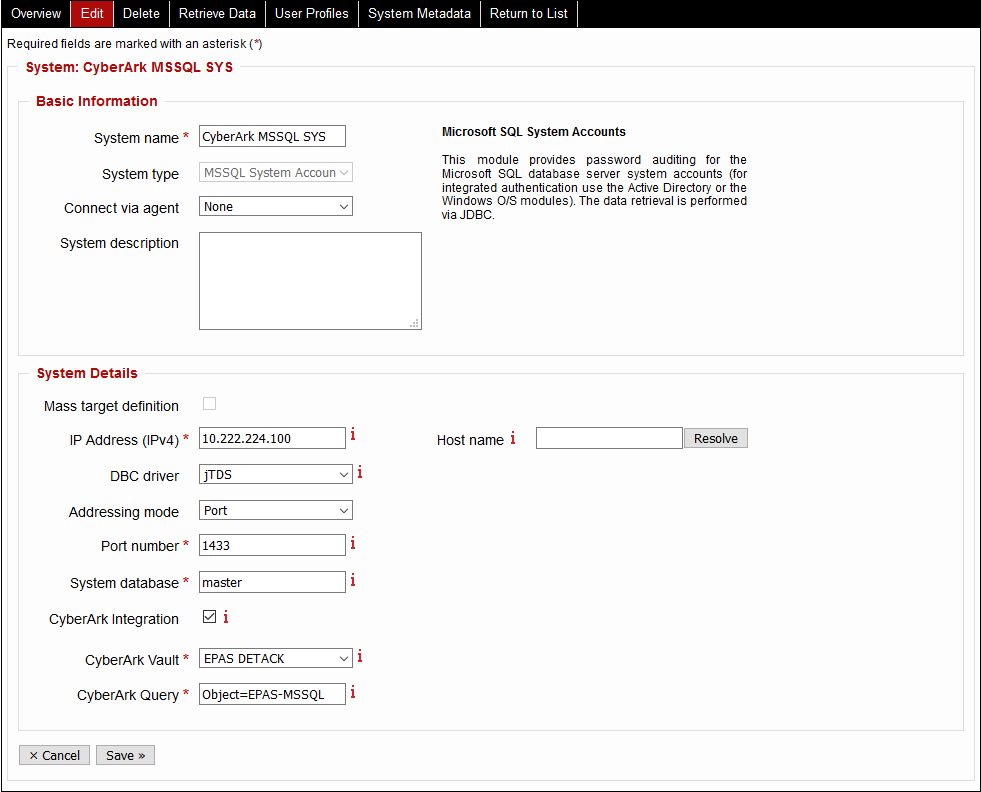
- Navigate to the Targets menu and add or edit any EPAS target.
-
For editing:
- Enable the CyberArk Integration checkbox.
- Select any vault configured during the previous section, in the CyberArk Vault dropdown.
- Enter a CyberArk Query identifying the object or credential set. The CyberArk Query is composed of several elements, separated by a semicolon, which identify the credential set:
- Safe: the name of the safe
- UserName: the name of the user
- Address: the address of the system
- Platform: the platform name
- Object name: full qualified object name
- For additional query options, refer to the "Central Credential Provider Implementation Guide" document.
Examples of queries include:
Safe=Test;Object=EPAS-MSSQL-SRV01Safe=Test;Address=1.2.3.4;UserName=AdministratorObject=EPAS-MSSQL-SRV01
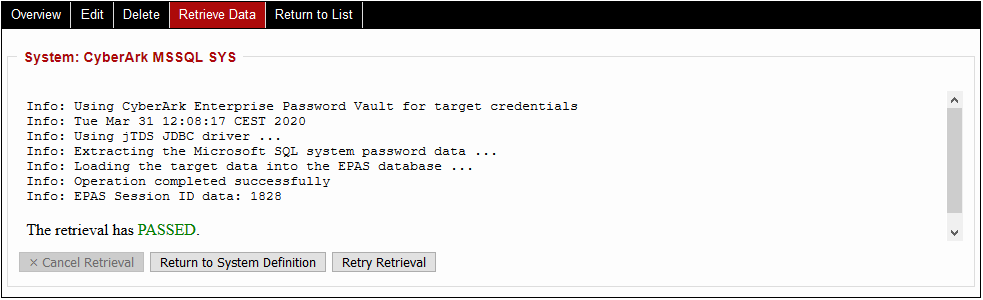
After saving the target definition. A new data retrieval operation can be performed, which leverages the CyberArk Vault integration: navigate to the Retrieve Data tab and start the operation.
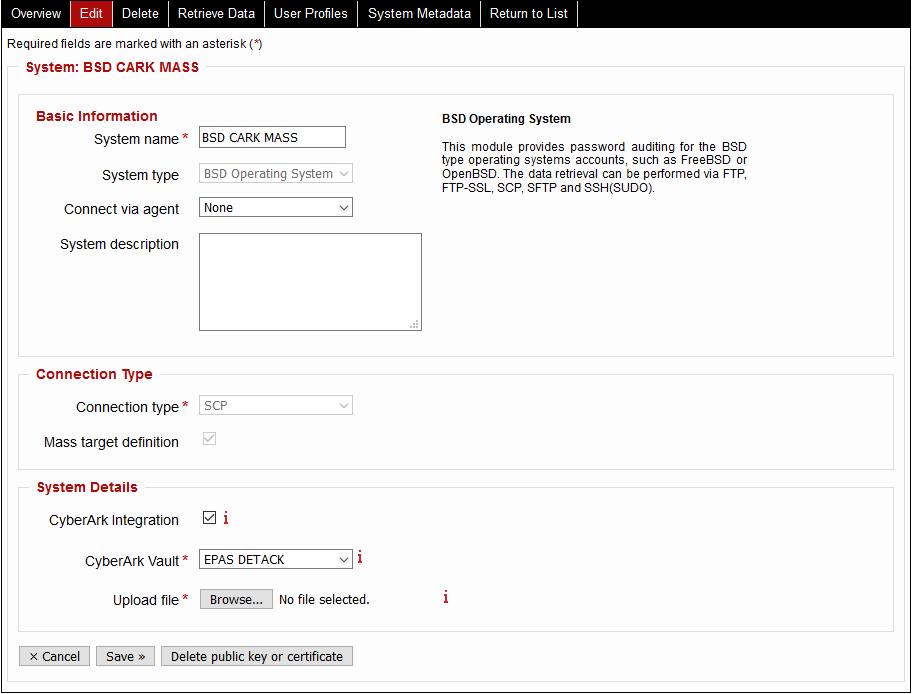
To use credentials provided by the CyberArk in EPAS MASS target retrievals:
- Navigate to the Targets menu and add or edit any EPAS target.
-
For editing:
- Enable the CyberArk Integration checkbox.
- Select any vault configured during the previous section, in the CyberArk Vault dropdown.
- In the uploaded file contents, make sure that the CyberArk Query is included in the field corresponding to the password (in the tab delimited structure defined by the target).
Examples of queries include:
Safe=Test;Object=EPAS-MSSQL-SRV01Safe=Test;Address=1.2.3.4;UserName=AdministratorObject=EPAS-MSSQL-SRV01
After saving the target definition. A new data retrieval operation can be performed, which leverages the CyberArk Vault integration: navigate to the Retrieve Data tab and start the operation.
Usage of the CyberArk integration ensures that:
- Privileged credentials are not stored within EPAS
- Credential retrieval is done at the data retrieval operation run-time
- Credentials are not cached or re-used by EPAS
- Switching the required credentials or migrating to other service accounts is seamless and does not require any changes in EPAS.