EPAS Systems
This section covers the necessary operations to configure and manage the following EPAS system types:
- EPAS AGENT
- EPAS WORKER
Physical Systems
This section covers the necessary configuration and actions, after performing the physical installation, for the EPAS systems (AGENT and WORKER).
Before proceeding with the component setup, make sure the devices to be added are physically mounted, installed, powered up and connected to their corresponding network ports.
EPAS AGENT Setup
To add and configure a new EPAS AGENT system:
- On the EPAS MASTER, navigate to the System menu, clicking on the EPAS Systems submenu.
- Continue by using the New Agent button, in order to be presented with the agent definition screen:
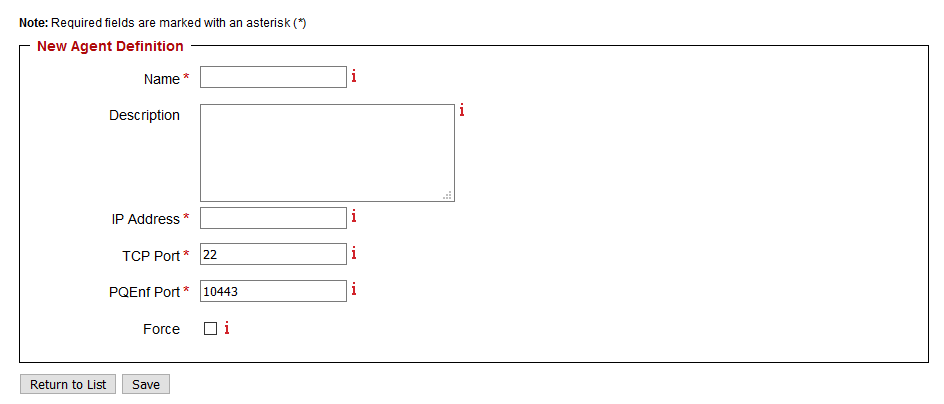
- Enter the Name of the agent. The agent name will be used for logging and displaying purposes.
- Enter, if applicable, the Description of the agent.
- Enter the IP Address of the agent, the corresponding TCP Port.
- Enter the TCP Port for the Password Quality Enforcer (PQEnf) listener.
- By checking the Force option, the agent will be added even if errors are encountered or the ownership of the agent does not belong to the current EPAS MASTER. By default, it is recommended to check the Force checkbox in order to ensure ownership of the agent to the current EPAS MASTER installation.
- Click Save to save the agent definition. The agent will be added to the EPAS Master configuration. In order to check for agent connectivity, a test can be run from the EPAS Systems submenu.

- Additional actions can be performed from the EPAS management web interface, such as rebooting the agent, shutting it down or removing it.
EPAS WORKER Setup
Make sure the MASTER unit is powered on, has finished booting, and the administrative interface is accessible. Once this has been confirmed, power on the WORKER system, and wait 5 minutes. After connecting the two systems, the EPAS WORKER systems can be configured, in the management interface, as described in the following steps:
- On the EPAS MASTER, navigate to the System menu, clicking on the EPAS Systems submenu.
- Continue by clicking the Detect Worker Modules button; this will detect any new WORKER systems connected to the MASTER system, and will update the existing ones.
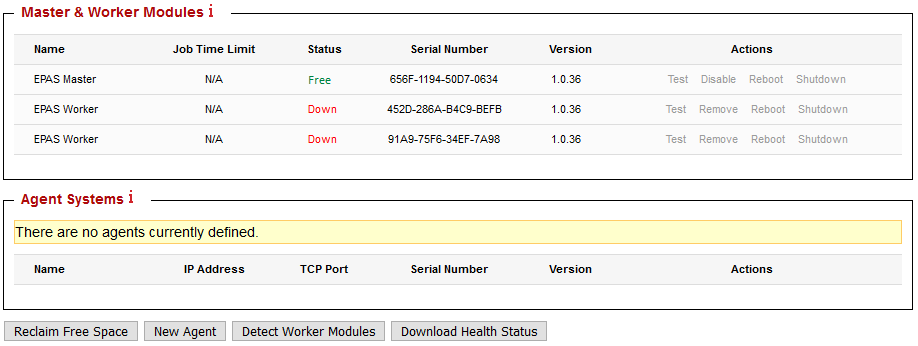
The EPAS MASTER system should now display all the WORKER systems that are connected to it.
Info
If the EPAS WORKER system does not contain the full set of dictionaries or dictionary lists from the MASTER system, or it requires a software upgrade, the MASTER will synchronize the dictionary data and / or upgrade the software version on the WORKER system.
During the synchronization of software updates operations, the WORKER system status will be Sync; a WORKER system in the Sync state is not usable by any audit jobs. The synchronization operation can take up to 90 minutes, depending on the size of the dictionary data available on the MASTER system. Once the operation has been completed, the WORKER system will be marked as Free and it will become usable by the audit jobs.
Virtual Machines
Starting with EPAS version 1.0.41, support for virtual machine deployments of EPAS WORKER and EPAS AGENT systems has been implemented. This allows the set up of the EPAS software solution by utilizing the customer's chosen Cloud infrastructure and resources.
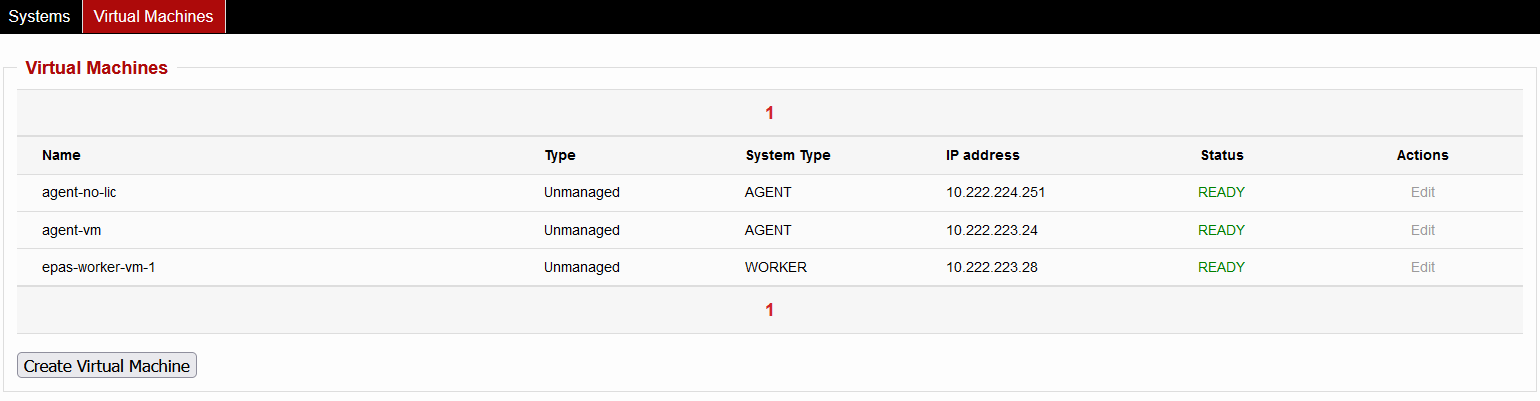
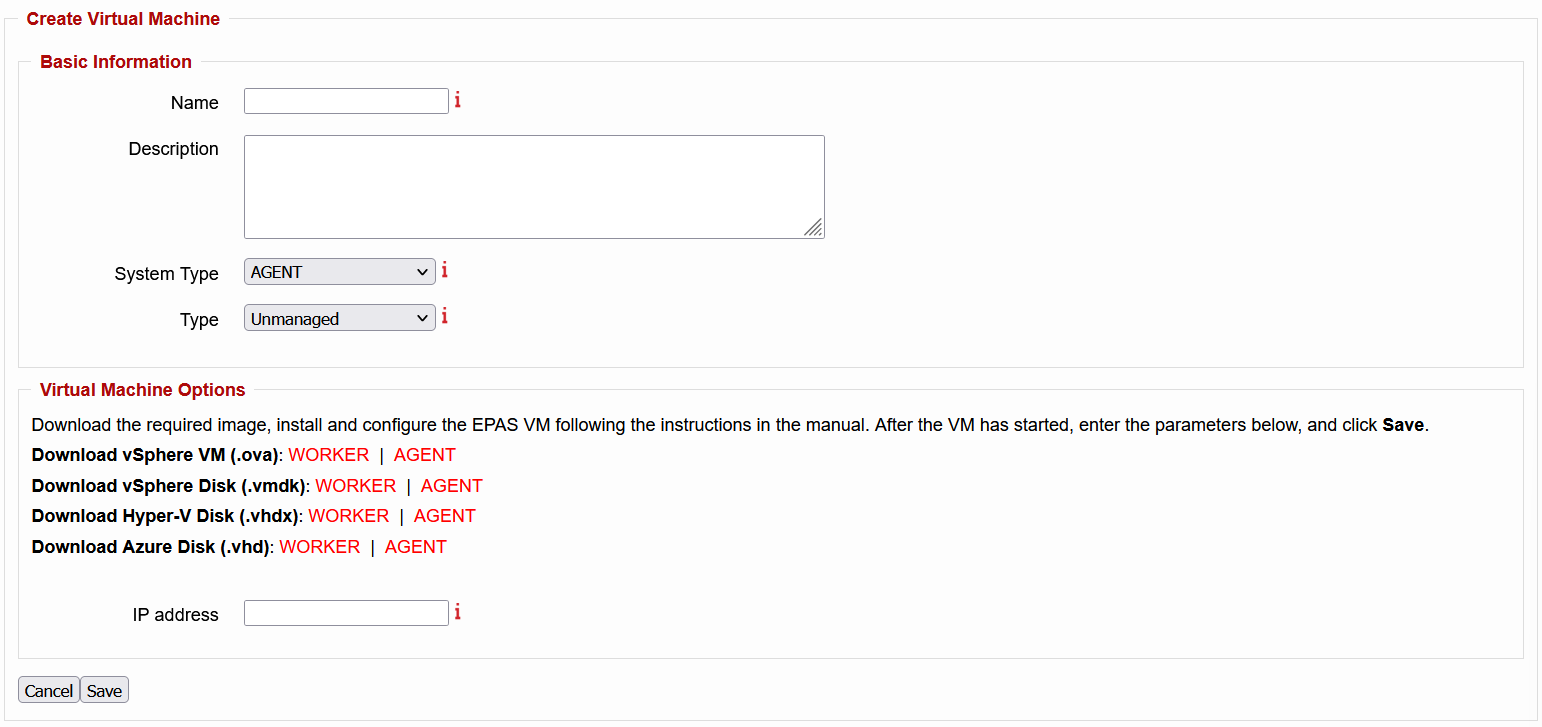
To provision an EPAS virtual machine, navigate to System → EPAS Systems → Virtual Machines and click the Create Virtual Machine button. Both EPAS WORKER and EPAS AGENT systems are supported.
The VMs act as full fledged hardware equivalents and achieve the same level of functionality. Data residing on the VMs is stored in a secure manner and encrypted-at-rest. When deploying an EPAS VM, two approaches are possible: Unmanaged and Managed - Azure.
Unmanaged VM
Unmanaged type VMs are manually deployed inside the customer's virtualization infrastructure. First, a VM needs to be provisioned and provided with the following:
- Guest OS: Other 4.x or later Linux (64-bit)
- CPU: at least a four core CPU is recommended
- Memory: at least 32 GB
- TPM: required
- Secure Boot: disabled
- Network: a static IP address reachable by the EPAS MASTER is required
- Hard disk 1: 1 TB
- Hard disk 2 (only for EPAS WORKER): 1TB
- Video card (only for EPAS WORKER): an NVIDIA card series
10XXor later
After a VM has been defined, an image compatible with the virtualization solution can be downloaded and installed. The following are available:
- vSphere VM (.ova)
- vSphere Disk (.vmdk)
- Hyper-V Disk (.vhdx)
- Azure Disk (.vhd)
Lastly, the assigned IP address of the VM can be entered in the respective field available when creating an Unmanaged VM on the EPAS MASTER. The defined VM will then appear on the Virtual Machines tab and after the initial boot operations are finished, it will be available and ready for use.
Managed VM - Azure
Managed - Azure type VMs are deployed using automated procedures in the customer's Azure environment.
First, in order for EPAS to be able to authenticate, deploy and manage VMs on the Azure Cloud, it needs to be registered in the environment and provided with permissions.
- To register EPAS in Azure, navigate to Microsoft Entra ID → App registrations, select the New registration option and create an application with the following access type: Accounts in this organizational directory only (Single tenant).
- Next, navigate to the newly registered App and select the Certificates & secrets section. There are two authentication options supported by EPAS: either a generated Client secret or an uploaded Certificate. A link to download the Certificate is available when defining the VM on EPAS, by selecting the Client Certificate option in the Authentication Type field.
- Afterwards, permissions need to be defined for the registered App. EPAS requires the ability to view, create and delete resources in the Subscription, in order to provision the necessary components and remove them in case installation fails. Additionally, it requires the ability to assign roles in Azure RBAC, in order to allow VMs to self manage (e.g. shutdown when unused to save costs). As such, in the initial provisioning step the built-in Owner role or a custom role with similar rights is required to be assigned at the Subscription level. After the VM is successfully created, permissions can be constrained to the Contributor role at the Resource Group level containing the VM.
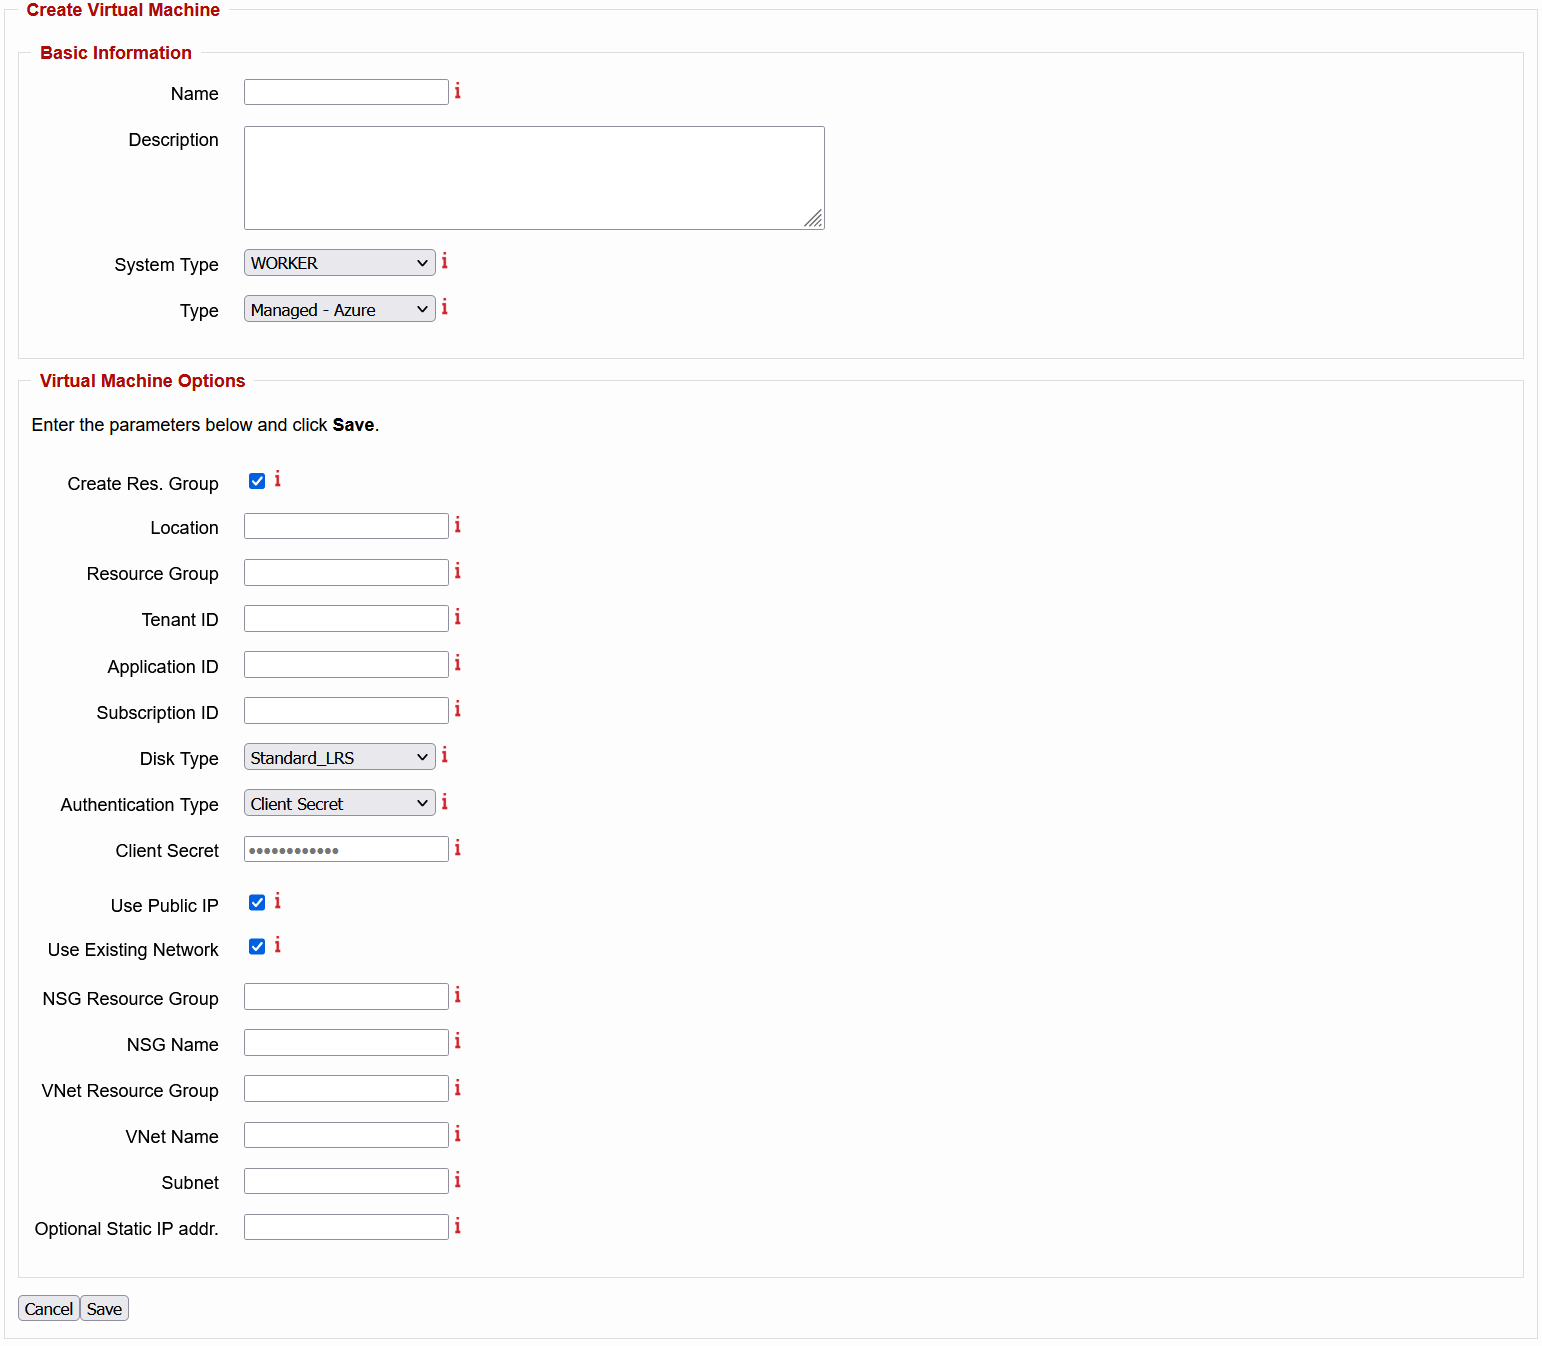
After registering EPAS on the Azure environment, VM AGENT and WORKER systems can be provisioned. The following parameters need to be configured:
- Create Res. Group: if this option is selected, a new Resource Group is created for the VM and its resources. If left unchecked, the VM will utilize the Resource Group specified in the field bellow, unless the specified Resource Group does not exist, in which case EPAS will automatically create it using the provided name.
- Location: the region of the data center (e.g. westeurope).
- Resource Group: the name of the Resource Group in which the system and its components will be deployed.
- Tenant ID: the globally unique identifier (GUID) of the organization deploying the resources.
- Application ID: the unique ID of the registered application that is used to authenticate EPAS to the Azure environment.
- Subscription ID: the unique ID of the Azure subscription used for billing.
- Instance Type: the VM size. See bellow tables for available specifications.1 2
- Disk Type: the type of the managed disk. See bellow table for available specifications.3
- Authentication Type: the authentication method used by the EPAS MASTER to connect to Azure. Supported options are Client Secret and Client Certificate.
- Client Secret: the client secret associated with the application ID.
- Use Public IP: if enabled, EPAS will request the cloud provider to also allocate a public IP address to the VM. Otherwise only an internal IP will be allocated.
- Use Existing Network: if this option is selected, EPAS will use the specified network resources. If the resources do not exist, they will be created using the entered name. Parameters that are left empty will result in the creation of the respective resource using the default naming scheme. See bellow table for details.4
- NSG Resource Group: the name of the Resource Group containing the Network Security Group to be assigned to the network interface of the VM.
- NSG Name: the name of the Network Security Group containing rules that allow or deny inbound and outbound network traffic to / from the VM.
- VNet Resource Group: the name of the Resource Group containing the Virtual Network in which the VM is to be placed.
- VNet Name: the name of the Virtual Network associated with the VM.
- Subnet: the name of the Subnet associated with the VM.
- Optional Static IP addr.: a non-reserved IPv4 address to be statically allocated to the VM. Must be situated inside the created / existing subnet range. If left empty, a static IP will automatically be assigned. The first address in the chosen network is reserved.
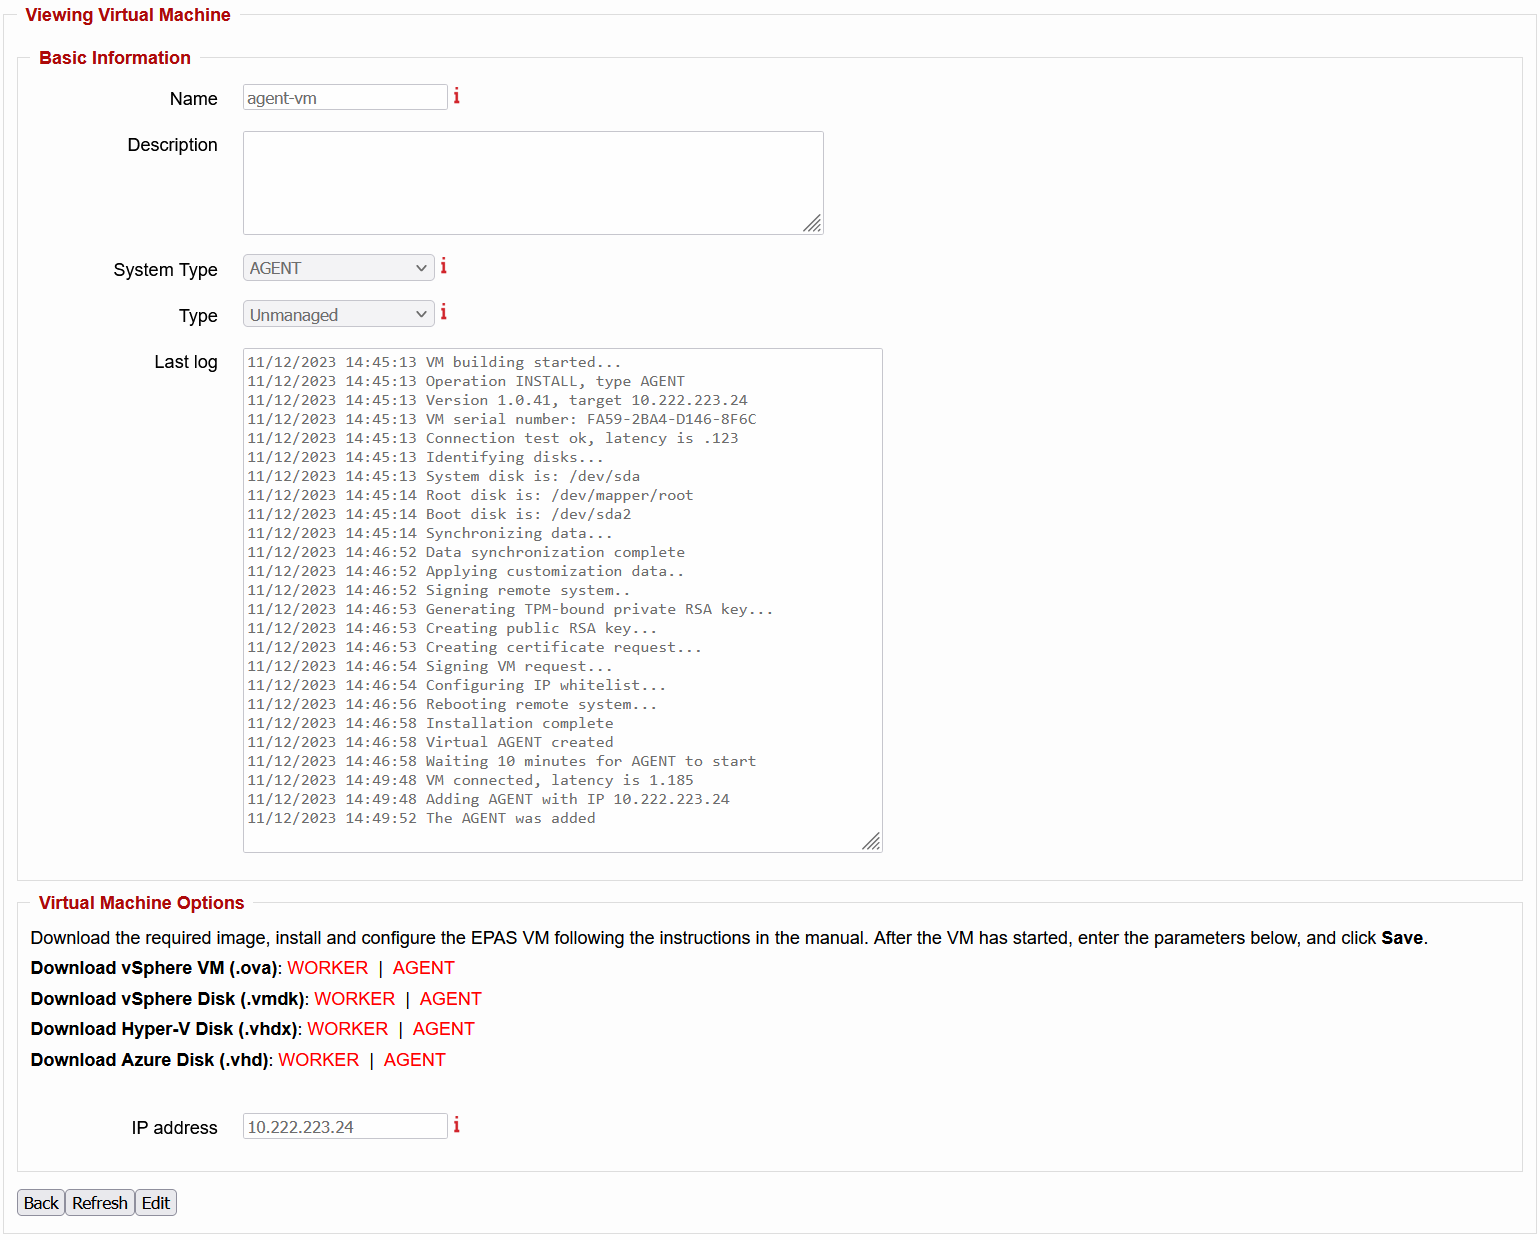
VM Operations
After filling in all the parameters and clicking the Save button, the defined VM will appear in the Virtual Machines tab. By clicking on the VM again you can inspect the Last log and see the status of the VM. The Edit button allows modification of the supplied parameter values. A failed provisioning can be restarted in the following way:
- Click the Edit button.
- Modify any incorrect parameter values.
- Click the Save button.
If the provisioning is successful, the virtual EPAS will be added to the Systems tab and it will be available to manage and use.
WORKER Clustering
EPAS supports the configuration of computational clusters, which allows EPAS WORKER systems to be allocated to functional groups that can be explicitly assigned to Audit Jobs. This allows an EPAS administrator to properly distribute the workload as needed, based on the following two factors:
- The hardware specifications and performance of the installed EPAS WORKER systems.
- The complexity of the Audit Job.
When creating or editing an Audit Job, the EPAS administrator may choose which Resource Group (i.e. Cluster) is to be used for the computational task. The Default Group contains all EPAS WORKER systems and sequentially allocates the next free one. To assign a specific set of EPAS WORKER systems, a cluster containing them needs to be created.
Cluster Definition
To create a new cluster, navigate to System → EPAS Systems and click on the Create Cluster button.
A window will display all the EPAS WORKER systems that are online and not assigned to any cluster. In order to create a group, at least one EPAS WORKER needs to be assigned to it.
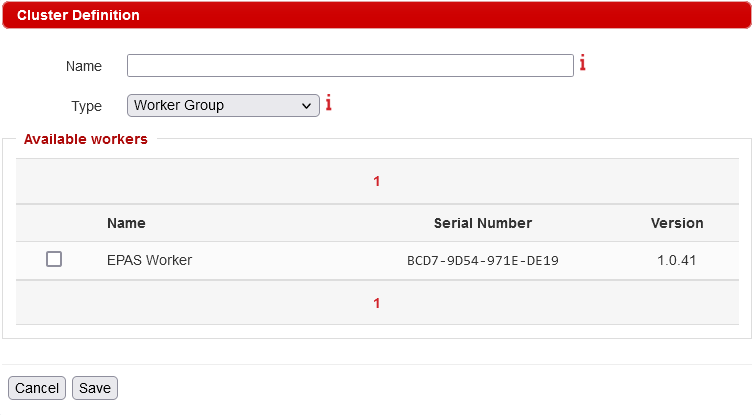
There are two types of clusters:
- Worker Group: a pool of workers that are allocated individually to jobs.
- High Performance Node: allows multiple workers to function as a single high-performance node.
Cluster Listing
After a new cluster is created, it will appear in the System → EPAS Systems, EPAS Workers section.
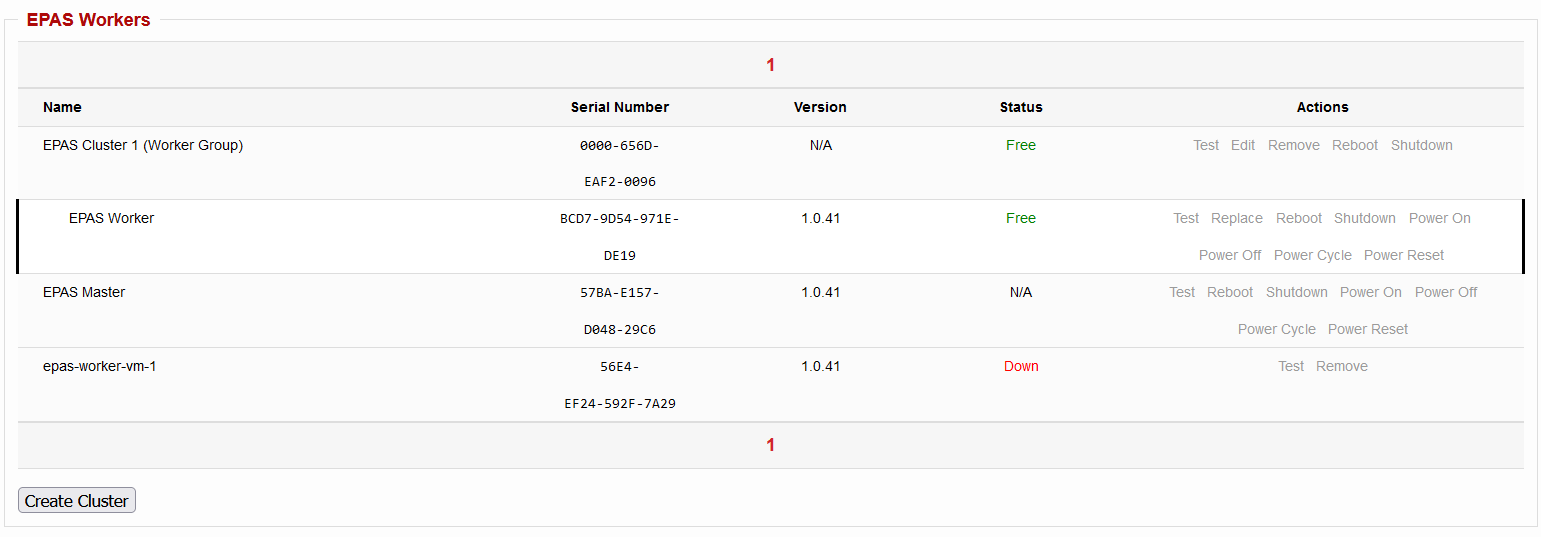
In addition to the operations available to each individual EPAS WORKER, the cluster also supports several maintenance actions, such as: Test, Edit, Remove, Reboot or Shutdown.
Note
Cluster removal results in the allocated WORKER units to automatically be switched to standalone WORKERs. All jobs that utilize the deleted cluster will be switched to use the default resource group.
-
EPAS AGENT VM Sizes
Size vCPU Memory (GiB) Base CPU Performance of VM (%) Standard_B8ms 8 32 33 Standard_B8s_v2 8 32 40 -
EPAS WORKER VM Sizes
Size vCPU Memory (GiB) GPU GPU Memory (GiB) Standard_NC24ads_A100_v4 24 220 1 80 Standard_NC48ads_A100_v4 48 440 2 160 Standard_NC96ads_A100_v4 96 880 4 320 -
EPAS VM Disk Types
Disk Type Disk Class Max Throughput Max IOPS Standard_LRS HDD 500 MB/s 2000 StandardSSD_LRS SSD 750 MB/s 6000 Premium_LRS SSD 900 MB/s 20000 -
Created Network Resources
Parameter Default Name Value Virtual Network (VNet) epas-network-<ResourceGroup> Network: 10.1.0.0/16 Subnet epas-subnet-<ResourceGroup> Subnet: 10.1.0.0/24 Network Security Group (NSG) epas-<type>-<ID>-nsg Allow Inbound Port 22