Security & Compliance
By default, all components of the EPAS are secured from physical attacks, by employing technologies which prevent unauthorized access to data, such as the Trusted Computing and full data encryption.
During the assembly process of the EPAS hardware appliances, all the data is encrypted using a unique random key, which is then, unless otherwise specified by the customer, destroyed. The encryption key is sealed to the unique hardware configuration of the EPAS unit. This process is built on the Trusted Computing technology, providing security and hardening of the hardware appliance. The encryption key is unsealed at the boot time automatically if no hardware modifications or boot software tampering has been detected; if any hardware or boot software modifications have taken place, the key cannot be unsealed and the entire content of the internal storage is permanently lost. The same can be achieved by destroying the TPM module, which is the normal EPAS unit recycling procedure.
After the hardware is sealed, the configuration data and all other information on the respective machine is only available to that exact hardware unit. This measure is taken as an additional hardening step for the appliance, to protect the customer data and to protect the EPAS internal software against unauthorized access. Any attempt to modify, remove or tamper with the hardware unit will render the data on the unit unreadable. Only the original hardware is able to read any data on the hard drive.
Local Security
In addition to the physical hardening employed with the EPAS, several factors affect the security of the appliance, factors which can be controlled by changing some of the local security settings within the management interface.
Security relevant options are available to any EPAS administrator via the Security & Compliance page located in the System menu. Security settings are split into 3 functional groups: EPAS Support Access, Security Monitors & Alerts, EPAS Users - Password policy.
Support access can be configured in order to allow support teams to connect to the system in order to provide support and maintenance. It is strongly recommended that all the available options are unchecked while the system is deployed within a productive environment.
The monitoring and alerting section of the Security Settings page enables an EPAS administrator to configure shutdown events and email alerts whenever one of the two main security monitors (chassis, movement / tilt) detects a potential intrusion attempt.
- If email alerting is enabled, enter valid email addresses in the Alert email destination field.
- If required, check any of the options in the Automatic shutdown conditions section in order to trigger an automatic shutdown of EPAS whenever a security incident of that type is detected.
The password policy settings for the EPAS users provides an additional layer of security for the user base of the EPAS system. The default minimum required values supplied by default ensure a strong password policy enforced for the users of EPAS. Password expiration for local user accounts is also available in the same area.
Additionally, the login mechanism of the system automatically blocks access for a short period of time if multiple failed login attempts are detected, preventing brute-force attacks against users of EPAS.
Data Retention Policies
EPAS enables an administrative user to automatically remove old report data, operational logs or Enforcer logs from the internal EPAS database, to comply with local data storage and security policies or to clean-up the internal storage facilities. The automatic purging operation can be performed individually for all three (3) report types: standard report, password reuse and aggregate reports, as well as for EPAS operational log data: system logs and EPAS Enforcer logs.
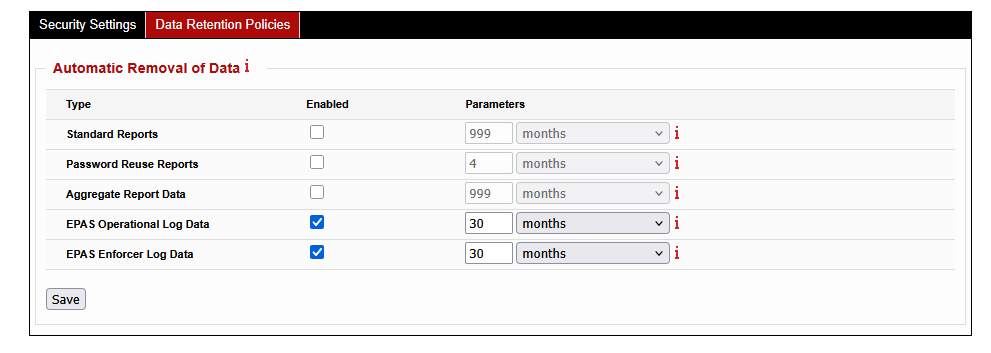
- Enable the automatic purge for any of the listed object types.
- Enter a numeric value between 1 and 1000, specifying the time interval at which the objects should be deleted. Select the time unit corresponding to the selected time interval: days, weeks or months. The two parameters represent the age of the data to be removed.
- Click the Save button to activate the purging operations.
Note
Automatic purge operations are not immediate, the checks are performed on a daily basis, in 24 hour increments; the operation is irreversible - once removed, data cannot be recovered without a full system restore operation.
SSL settings
Web Service SSL/TLS Certificate Generation
By default, the EPAS management interface is listening SSL enabled HTTP ports. In order to verify and authorize the SSL-enabled connections to the EPAS Master web interfaces (management interface and password quality interface), a certificate needs to be installed on the EPAS Master.
When initially set-up, EPAS comes with a self-signed certificate. It is recommended, for best security practices, to change the certificate that is supplied with the default installation of EPAS with a valid, customer signed SSL certificate.
The process of generating a valid certificate is split into three steps. In the first step, the requesting authority (EPAS) generates a private key to be used to decrypt all future incoming communications; in the second step the requesting authority (EPAS) generates a Certificate Signing Request (CSR), which includes the public key corresponding to the requesting authority, along with other information to be included in the certificate such as the organization name, common name, country, etc. In the third and final step, the Certification Authority (CA) will use the information contained in the Certificate Signing Request in order to issue a new certificate - valid under the trust of the CA.
In order to generate a CSR, within EPAS, it is necessary to navigate, as an administrative user, to the System menu and then to the SSL Settings area.
- Fill in the required common name attribute. This should correspond to the fully qualified domain name (FQDN) of the EPAS Master installation.
- Fill in any optional attributes, if necessary.
- Fill in the SAN (subject alternative names) to contain any IP addresses or hostnames. It is strongly recommended to also add the common name to this field.
- Enter the number of days that the certificate should be valid for.
- Generate PKCS#10 CSR
The generated certificate request should be used in order to create a new certificate for the web services running on the EPAS Master. Use newly generated certificate by pasting its contents (DER formatted) and clicking on Install Certificate.
Site Keys
EPAS uses a set of authentication and encryption keys for the internal communications between the MASTER, WORKER, and AGENT units. Although these keys are never used outside of EPAS, are cryptographically strong, and are protected using the Trusted Computing, the keys can be changed to randomly generated ones should the enterprise specific security policies require the usage of unique key.
When the site keys are activated by using this option, a new set of random RSA keys will be generated and used for all the EPAS units belonging to this site. The default keys will no longer be in use. Any new EPAS system (WORKER, AGENT) added to this site will have the default keys switched to the site keys upon enrollment.
Toggling site keys
The activation of site-specific keys is done using the maintenance tasks available under the System → Maintenance menu. If the default communication keys are used, press the Activate Site Keys action corresponding to the Site keys task.

It is also possible to revert to the default keys for the entire site; this is the recommended action when preparing the system for decommissioning or for hardware upgrade. To revert back to the default keys, use the Restore Default Keys action corresponding to the Site keys task, under the System → Maintenance page.
Note
Changing the default keys to site keys or vice-versa requires all WORKER modules to have a status of Free in order to avoid interfering with running audit jobs.
A WORKER or AGENT system using the site keys cannot be moved to another site, as they keys will be different. When a WORKER or AGENT system is manually removed, should the connectivity to that system still be available, the keys on the component being removed will be reverted to the default keys, with the site keys removed.
Forcefully resetting site keys on WORKER or AGENT units
Should a WORKER or AGENT system be physically removed without using the remove link on the EPAS MASTER, and therefore be still using the site keys, the keys must be manually reset before the system can be connected to another site. In order to manually reset the keys, perform the following actions:
- Connect a terminal to the serial port of the units with the following parameters:
115200 8N1 - Choose option Reset site keys to factory defaults and press Enter.
SSL/TLS Certificate Store Configuration
For EPAS version 1.0.31 and newer, full-chain SSL/TLS validation is implemented for specific application integrations (e.g. CyberArk) or for external authentication requests LDAP.
In order to leverage the certificate store for the above operations, navigate to the System → SSL Settings menu and click on the Certificate Store tab.
- Click on the Certificate Store tab.
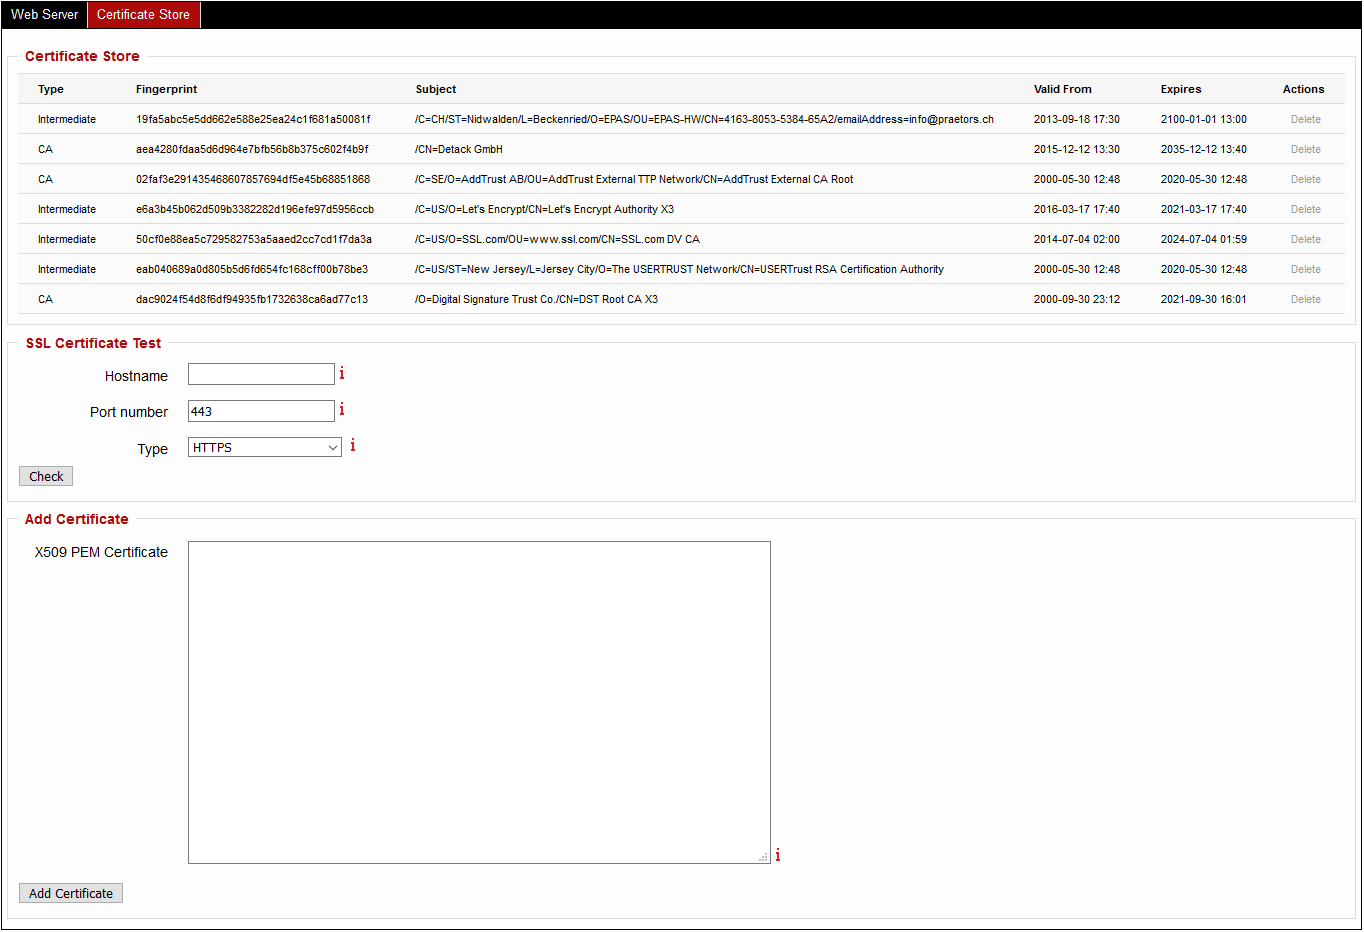
- Enter in the X509 PEM Certificate an X509 PEM encoded trusted certificate (either CA or Intermediate).
- Repeat the above step for all certificates in the chain, up to (not including) the Central Credential Provider server certificate.
- Validation for any given hostname or IP address can be made by using the input elements in the SSL Certificate Test section.
Security notice
After adding a valid certificate chain for LDAP external authentication, it is strongly recommended to enable SSL/TLS CA Validation in the System → Security Settings page under External Authentication. With the option disabled, EPAS makes regular fingerprint-only checks on the LDAP certificate.