Defining Target Systems
EPAS retrieves account profile information from remote servers to assess the password security of the respective system. The collection of systems EPAS connects to in order to retrieve the account profile information is available using the Targets menu.
The target listing page provides general information about the already defined target systems and their respective status. Edit and delete options are provided next to each target entry for easy management of the current target list.
In order for a job to be added, a target system must be defined and an initial set of account profile information must be extracted to verify the integrity of the account profile information. In order to add a new target system, the system definition wizard is available by clicking the New Target under the Targets menu.
The system definition wizard consists of 3 or 4 steps in which the target system parameters are set-up. This allows easy communication between EPAS and the target system for future audit jobs.
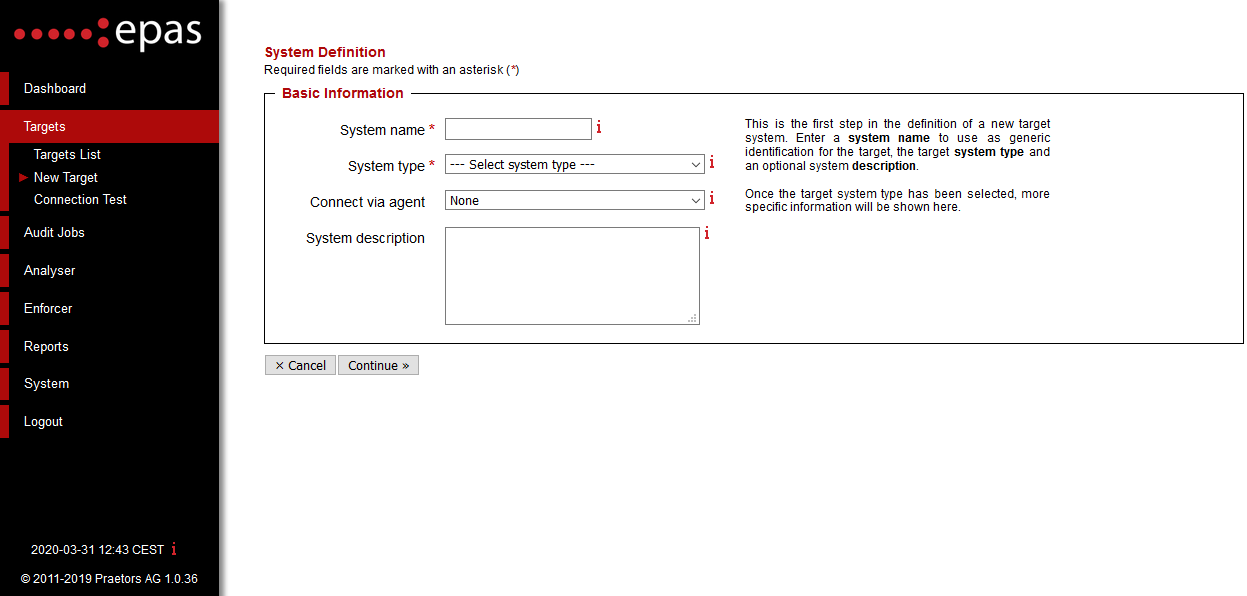
The first step in the system definition wizard consists of providing general target information:
- Enter the system name
- Select a system type (e.g. Microsoft® Windows Active Directory, IBM System z - zSeries - S/390 z/OS RACF, etc.)
- If EPAS agents are configured, select the agent which should be used for the retrieval process.
- If applicable, enter the optional system description, providing more information about the target.
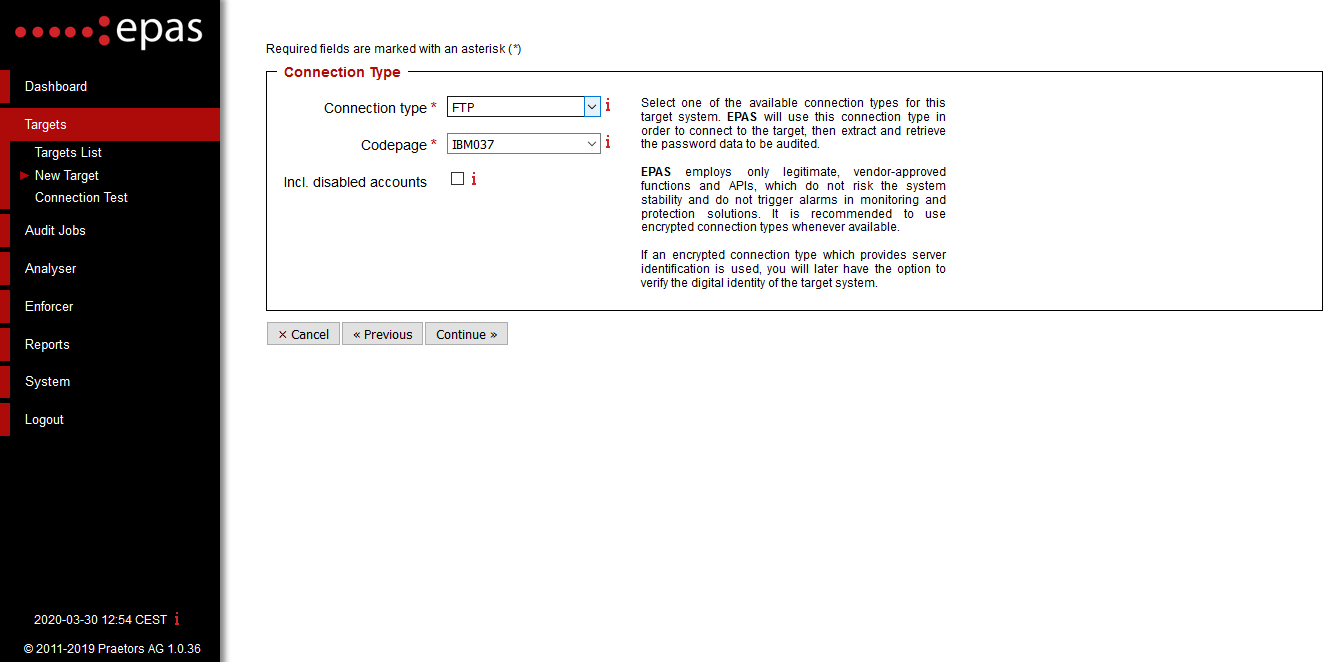
- The second step in the system definition regards connectivity options, such as the method of contacting the target system.
- Select a valid connection type. For major UNIX-based environments, the options provided are
FTP,FTPSSL,SFTPorSCP. - For IBM iSeries or zSeries, specify the code page of the respective instance.
- In case of auditing a custom application using a common database, select the method of specifying the database columns, either via an SQL query, or by providing the column names.
Note
For targets defined for auditing system database accounts, such as MySQL system accounts, MSSQL system accounts, Oracle system accounts, etc. the current step is automatically skipped.
The third step in the target definition process collects connection parameters, such as the target system IP address, service port, credentials used when authenticating to the target system. The step differs between target types.
The fourth and final step of the target consists in inputting the connection details specific to the target system added.
For example, a Microsoft® Windows Active Directory target will require the following information:
- Enter the Microsoft® Windows Active Directory server IP address1.
- Enter the domain name. Domain names should not contain special characters or spaces.
- Enter an administrative user account for the domain previously specified.
- Enter the password for the administrative account.
For an IBM System z - zSeries - S/390 z/OS RACF target, the following information is required:
- Enter the RACF instance IP address1 (e.g.
10.222.222.123). - If different, specify a service port to connect to. This defaults to port
21on most RACF instances. - Select the method used to retrieve the account profile information. This can be a data set or a name table.
- If using a name table, enter the library name and select the database (primary or secondary). Alternatively, enter the data set name in the appropriate field (e.g.
SYS1.RACFDS.BACKUP). - Enter the username and password credentials in order to authenticate to the specified system.
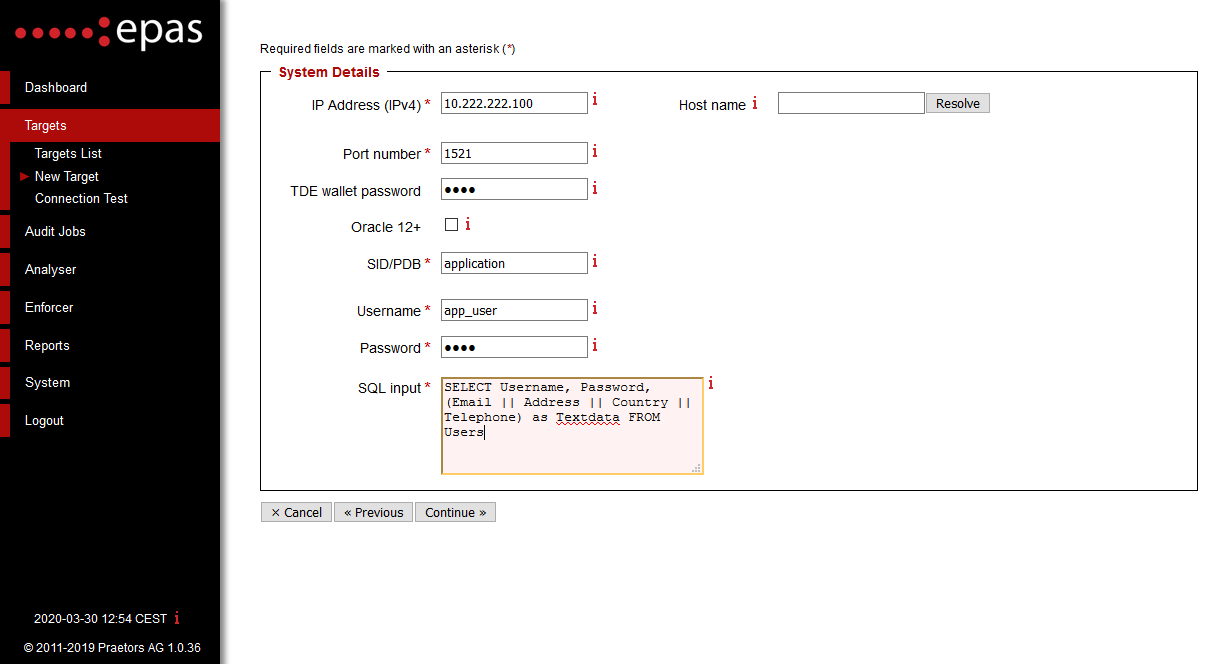
For a custom application audit using an Oracle database there are two possible ways of defining a target. If the "Enter Custom SQL Query" option has been selected in the previous step, the following information should be specified:
- Enter the Oracle server IP address.
- Enter the service port for the Oracle database server. This default Oracle database server port is
1521. - Enter the Oracle System ID.
- Enter the credentials (username / password) needed in order to authenticate against the database server. It is mandatory that the specified credentials have at least read access on the database table audited.
-
In the SQL Input field, enter the custom SQL query which selects the columns from the database table. The entered query should return 3 columns, in the following exact order: username, password and text information. Any additional data / text field, which contain extra information about the audited accounts (e.g. email address, delivery address, and telephone number) should be concatenated in the third column. The custom SQL query should respect the syntax of the database server defined as a target.
Example
A valid query for the Oracle database would be:
SELECT Username, Password, (Email || Address || Country || Telephone)
  as Textdata FROM Users
Alternatively, if the "Specify Table & Columns" method was chosen in the previous step, enter the database table name and the appropriate columns in the fields required.
-
The IP address field can contain one or more IP addresses, separated by comma (
,). In case multiple IP addresses are in a single line, the EPAS will attempt data retrieval on the first one (left to right), and in case of failure, will attempt to use the secondary, third, etc. IP addresses to retrieve. ↩↩